Hello!
Thank you for choosing this curriculum as maybe the start or even a part of your journey in tech. If you have coding experience- that's great! But if you don't, that's fine too! This course is for any level.
Please keep in mind in order to earn your certificate you must take notes and send in your notes to us so that we make you completed the required learning documentation. You must use google docs. It makes the process easier and helps us give you your certificate in a timely fashion.
The linked textbook sections are also not the ONLY parts of the reading, you must finish the associated readings with each section.
Mission 1: Run (AND CODE!) Like a Girl
Start with this video. In this video, people are asked to "run like a girl." While guys (and even the older girls...yikes..) often mimic a weak or silly run, young girls show exactly what it really means: running as fast as you can .
Now you certainly don't run like that. And you might be wondering why I asked you to watch this video. Well, you may have heard that coding is a male dominated field and that the best ones are men. That's not true at all! The first ever computer scientist was Ada Lovelace and she taught herself to code only using what would theoretically work. She made history as the first ever computer scientist! Now if anything, I think coding was made for girls. When you code "like a girl," you are coding with the same power, precision, and history-making potential as the founder of the field itself. Who set the future? A girl.
Mission 2: Getting to Building
Okay now time to get to building! You didn't come here to print out "hello world" ....and I certainly didn't advertised mundane printing....but here's the thing- html is essentially the blueprint before the decoration.
Those who love fashion, have you ever tried drawing out a dress and had to draw out maybe the collar or the hem? Did you work your way up? Now I was never a traditional artist but I used to like sewing. So did any of you fellow sewing enthusiasts start out by cutting the fabric out? Yeah?! Then that's what html is essentially! Before you make a dress or pillow, you need to outline everything out first and that's essentially what html does before you add css and javascript.
Maybe things look pretty bad without fancy stitches or intricate designs, but you have to start with learning to make outlines! But, in fashion, you don't start with the sequins; you start with the pattern and the cut. HTML (HyperText Markup Language) is the "fabric" of your website. It’s the raw outline before we add the "fancy stitches" of CSS. Now, please read the textbook sections and complete the exercises.
Mission 3: Pinkify Your Textbook
Okay now before you move ahead. Maybe you're complaining about the textbook not looking pink enough. I get it. You came here because it's P.C.C....it's Pink Coding Club not Grey Coders Unite or whatever...but okay I'll teach you how to pinkify your textbook. First, right click to that grey area that's right next to "check your code." Mine is pink since I already added my touch.
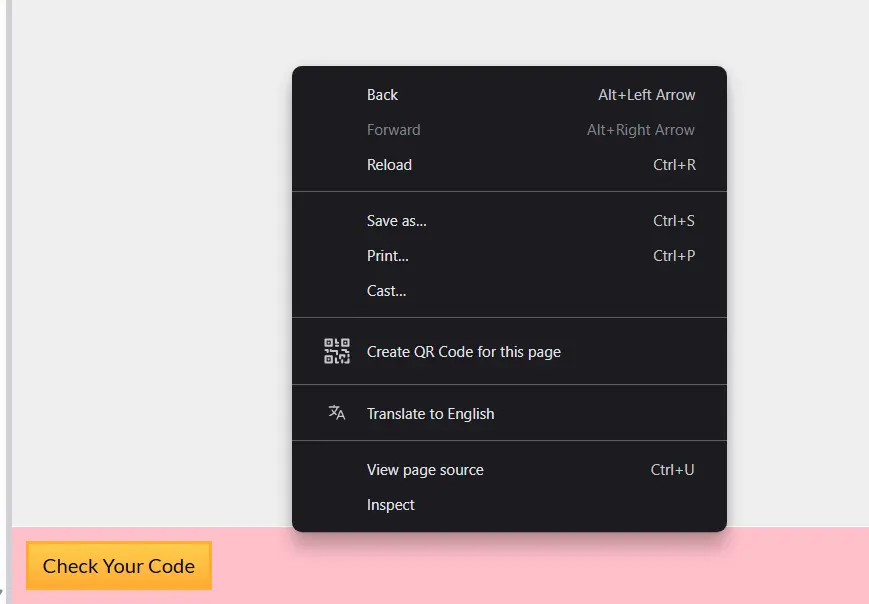 STEP_01: RIGHT CLICK > INSPECT
Next press "inspect". Okay now maybe you see a bunch of code and that's kinda scary. But don't worry, just press the code that's highlighted in my example and you should see all the "roots."
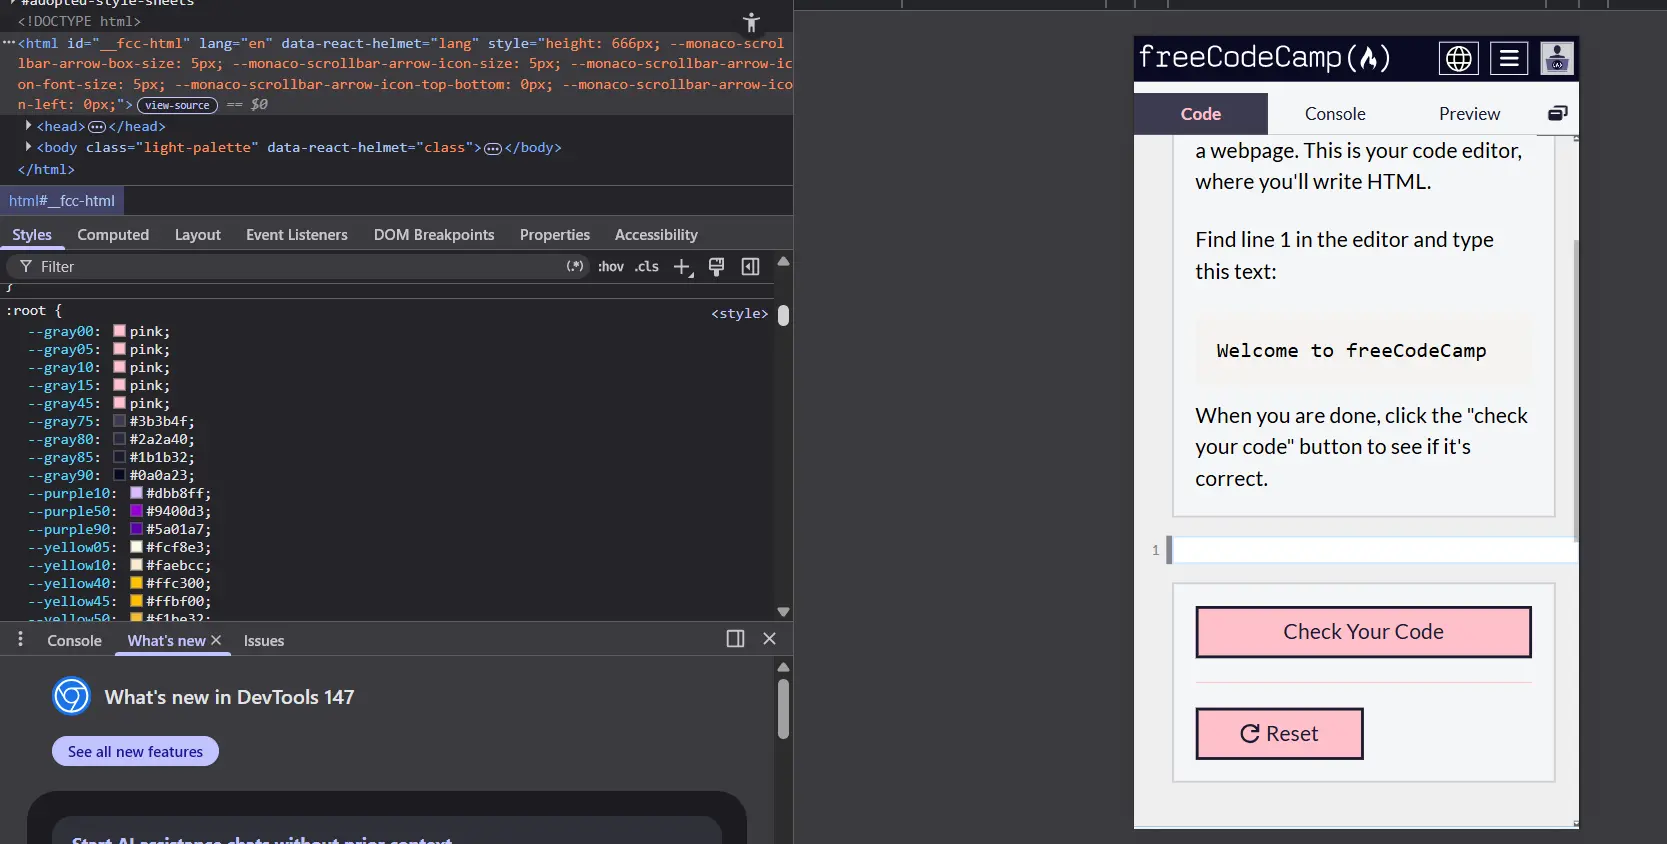 STEP_02: FIND THE :ROOT COLOR VARIABLES
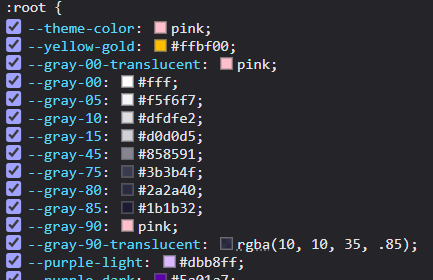 STEP_03: FIND THE :THEME-COLOR VARIABLE
Now I think you see a ton of color options but it's all #fff or #anythingblahblahfollowedbyahashtag. You can just replace those with "pink" and you're all set. However, it might be a long time before you actually pinkify anything...but play around with it first. You're actually playing around with css and we'll get more into that later. But actually scroll down until you see "theme color." That's the one you wanna replace with "pink!" How did it go? This is what I have so far.
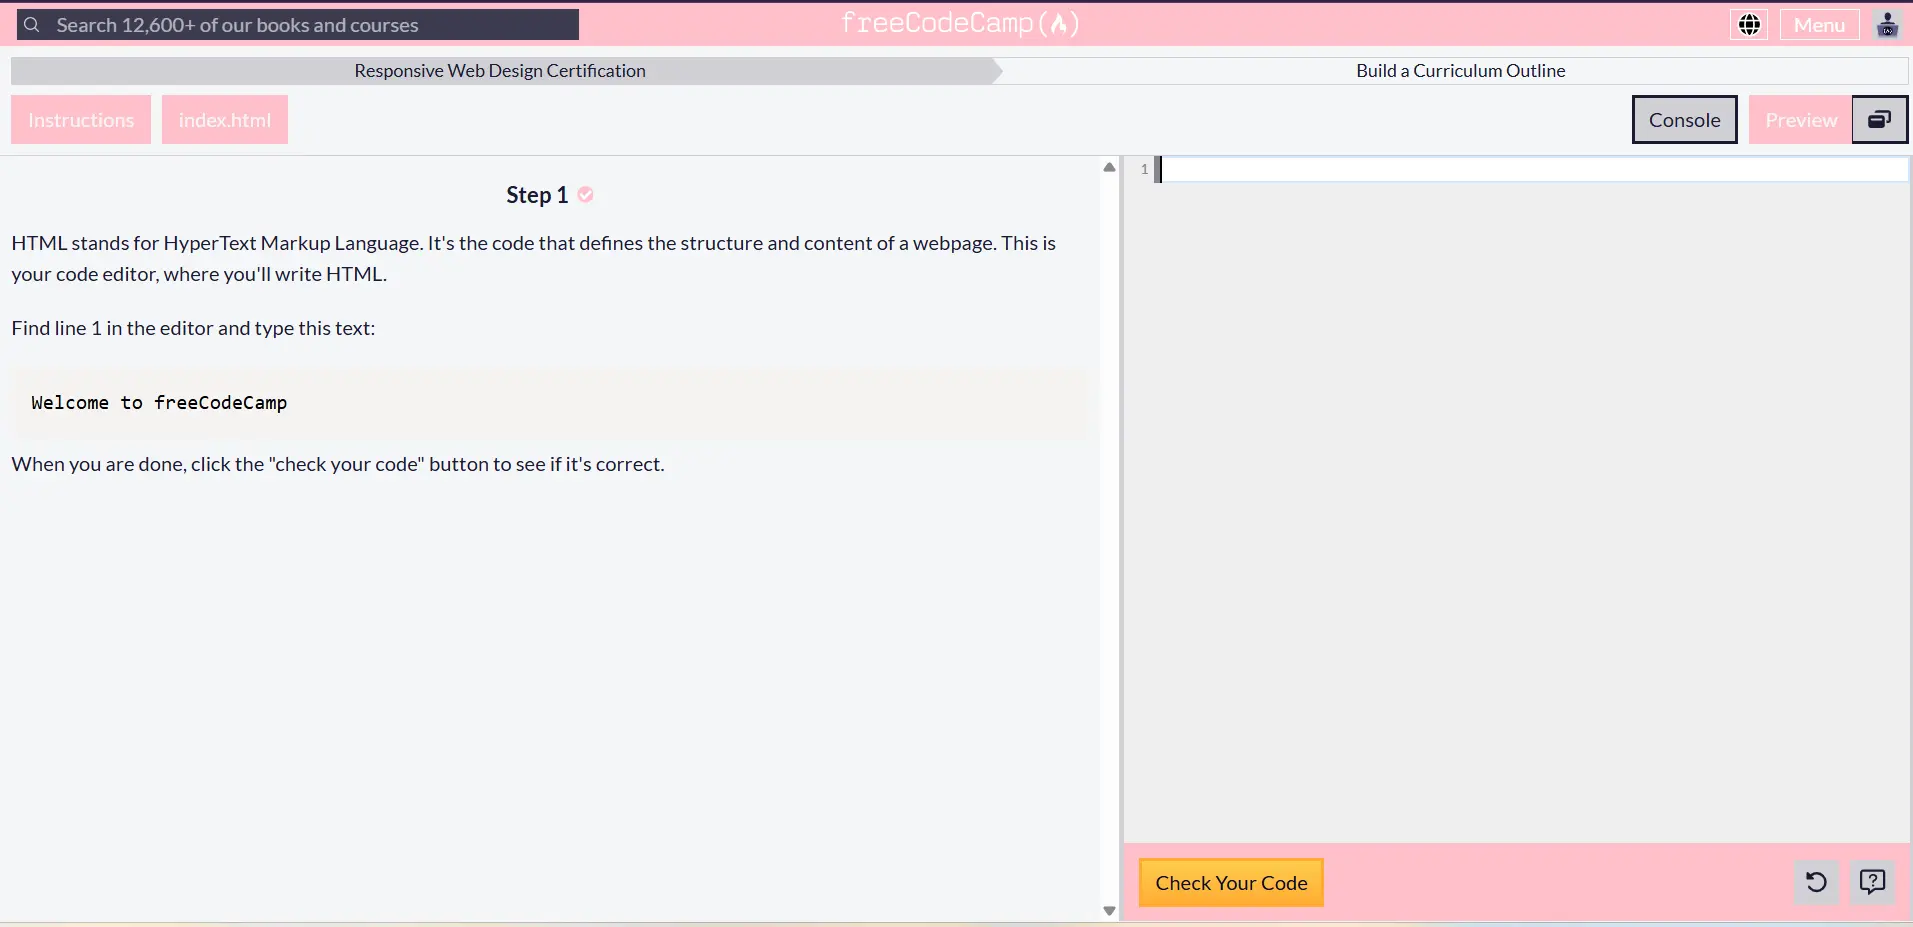 STEP_04: PINKIFY
Mission 4: Structural Integrity
Every great gown needs structural integrity so it doesn't collapse on the runway! In web design, that unseen structure is called the Boilerplate. It’s like the internal lining, boning, and canvas framing of a garment. It is completely invisible to the person wearing it, but without it, the fabric has absolutely no shape!
Every single HTML file starts with this exact code skeleton to tell the browser how to interpret your fabric. The <!DOCTYPE html> declaration at the very top tells the browser to use modern, standard rules. The <html> tag acts as the entire outfit, enclosing absolutely everything else. Inside, we split things into two main parts: the <head> section, which holds hidden metadata, title tags, and stylesheet connections (kind of like the garment tags and wash instructions), and the <body> section, which contains all the visible headers, paragraphs, and components that actually walk down the runway. Let’s practice handling this structure by fixing a pet adoption setup and outlining a custom recipe pattern!
Mission 5: The Fashion Palette (Media)
An all-white piece of plain muslin cloth is fine for practice, but we're here to add color, texture, and custom prints! This is where media comes into play. Think of images and SVGs as specific patches or custom lace embroidery patterns that you stitch directly into your core layout.
To add images, we use the <img> tag. Notice something interesting about it? It’s a "self-closing" tag, meaning it doesn't need a secondary closing patch. It just needs the src attribute to find the image file and an alt attribute. The alt text is non-negotiable! It writes out a clear description of the graphic so that if a file doesn't load or if a visually impaired user is using a screen reader, the machine can accurately describe your design work. We will also look at SVGs, which are like mathematical vector embroidery paths that never get pixelated, and dive into <audio> and <video> layers to build a fully operational media showcase!
Have fun with building out a heart! Just the thing for your design to be girly to the max!
Mission 6: Interactive Elements
A garment without functional fasteners is just a drape of cloth. Links and iframes are the zippers, buttons, and transparent pockets of the web world! They create connections and build windows out into entirely separate locations.
The anchor tag <a> works like a classic metal snap hook, latching onto a target file pathway through the href attribute. If you're linking to an outside space and don't want people leaving your fashion showroom completely, make sure to add target="_blank" so it rolls open in an entirely separate browser panel. Meanwhile, the <iframe> element is total magic! It’s like stitching a clear plastic viewing pocket right onto your fabric that safely embeds an entirely independent webpage or live streaming clip right inside your custom environment!
Mission 7: Semantic Outlines
When you look at a garment pattern, it's explicitly broken down into standard panels: sleeves, collar, bodice, and hem. If you just labeled everything "piece of fabric," a tailor wouldn't know how to assemble it. That is exactly what semantic HTML solves! Instead of lazy web-building with generic, plain <div> boxes everywhere, we construct clean structural meaning using elements like <header>, <nav>, <main>, <article>, and <footer>.
This clean structural system is essential for SEO (Search Engine Optimization). Think of search engine spiders from places like Google or DuckDuckGo as boutique shopkeeper. They use your semantic markup and internal <meta> context labels inside the <head> tag to instantly figure out what your webpage is selling, allowing them to hang your creative work on the perfect retail rack for matching search queries!
So essentially, they are like a designer's label. SEO is like the label on the back of the dress. The customer (the user) might not see it, but the shopkeeper (Google or Duckduckgo) uses it to know exactly where to hang it in the store.
Mission 8: Measurements (Forms)
To create a gorgeous custom outfit, a tailor has to collect exact individual measurements. Web interactive forms work exactly the same way, they collect specific input data straight from the client! We set up our framework using the <form> element, which acts like our main data clipboard.
Inside, we pin empty <input> slots. But remember: an input slot without a guide label is just a blank chalk line on a pattern piece! You must connect every input to an explicit <label> tag using matching id and for attributes so everyone knows what detail belongs where. You can choose from standard text areas, check boxes, or radio options (for choosing only one specific dress shade!). If your seams start getting slightly uneven, we’ll run everything through a specialized HTML code validator to check for loose markup threads.
Mission 9: Advanced Accessibility
Fashion is for everyone. Web design is the same. Creating accessible code (often shortened to digital a11y) is just like introducing inclusive sizing or adaptive closures to a fashion line. It ensures your creation can be beautifully navigated and enjoyed by every single individual, no matter how they access the web. Girly girls don't gatekeep.
Sticking to strict semantic elements already gives screen readers and keyboard users a clean, logical pathway to browse your fabric layout. But when standard visual panels need an extra bit of contextual explanation, we apply specialized ARIA attributes (Accessible Rich Internet Applications). These work like tactile braille annotations woven into the seams, giving assistive technologies explicit structural context regarding what your dynamic components actually do behind the scenes!
Mission 10: The Data Weave (Tables)
Sometimes a dynamic pattern designer needs an organized interlaced pattern, like a perfect tartan or a gingham check weave to handle complex, dense structural information. HTML grids and tables provide the perfect structured weave to catalog inventory parameters or chart numbers without losing clean spacing!
We spin up our custom structural grid out of an primary <table> element, sorting our alignment clean across linear row divisions using <tr>. Inside those rows, we split individual columns into top-tier category headers <th> and standard internal cell definitions <td>. Precision here is absolute! If you drop just one closing tag or skip an individual cell line item, your whole weave slips out of alignment (distorts your table format).
Mission 11: The Ultimate Review
Before we roll out our collections for the official runway and start adding pink dyes and decorative laces using CSS, we have to conduct a final technical inspection. It is time to look back at our basic structural stitches, clip away loose structural threads, and make sure everything is completely clean!
This review mission is designed to consolidate all your markup knowledge. We'll track back to double check text formatting tags, audit file architecture connections, and look at general computer fundamentals. Having a solid understanding of how local directory folders pass paths to web browsers ensures your internal image pointers and link anchors stay perfectly connected!
Mission 12: The First Runway
Welcome to your very first debut runway exhibition! You have officially mastered the complete HTML framework of the P.C.C. curriculum. Now, it’s time to put your skills to the test and construct complete independent web layouts. Note: these are not the final certifation projects for P.C.C.'s program, but they're great application and you can make it however you want. ALSO YOU ARE NOT EXPECTED TO KNOW EVERYTHING!!! Just play and dabble with the ideas! Once you are comfortable, you are free to move on to the next section! There's no need to actually FINISH each project here but again it's great practice and helps prove mastery to yourself so that you can build that self efficacy!
I personally really suggest playing arround with the product landing page because that relates to your final project required to earn your P.C.C. certificate, but again just play around with it. You don't need to know it all! However, practice makes perfect.
Dress Outline Complete. Ready for Stitches?
CONGRATS!! You've finished the HTML portion of the P.C.C. curriculum! Next up: CSS! Where we take simple designs and TURN IT INTO COUTURE with our own custom styles.